INTRODUCTION
This project has been designed to help students get started with a Robot on the Raspberry PI. The principle hardware required to build the Robot Arm consists of the following components:
- A Raspberry PI computer
- A Maplin Robotic Arm
- Optional Joystick (Logitech or similar)
- Optional twelve button interface (Self build)
FEATURES

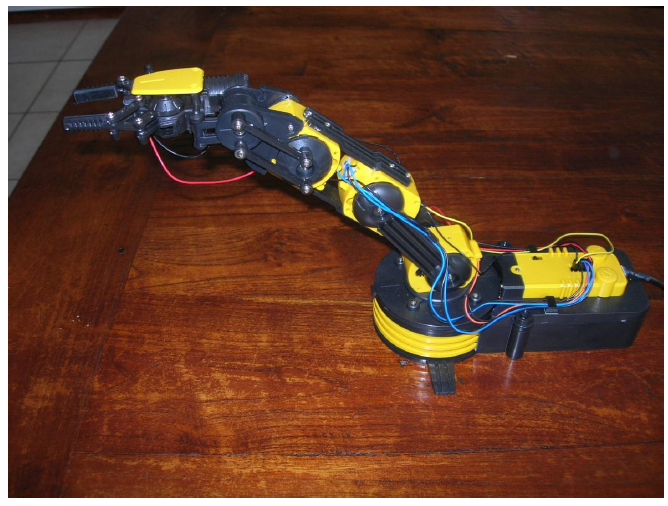
Figure 2 Maplin Robotic Arm.
The Robot Arm interface provides five separate ways of driving a Maplin Robot Arm. These are:
- A USB Joystick (Logitech or similar)
- A twelve push button interface
- A keyboard interface
- Using an input file containing the required robot commands
- A command line interface using required robot commands
LIMITATIONS
The Maplin Robot Arm does not have any positional feedback that the program can make use of. The program has no idea of the current position of the robot arm or gripper. This means that you must observe the Robot Arm position whilst moving it around to position it to say pick up an object. This means that the robot arm can never be programmed to carry out a repetitive task with any accuracy. This is purely a fun project with very limited application.
BUTTON INTERFACE WIRING

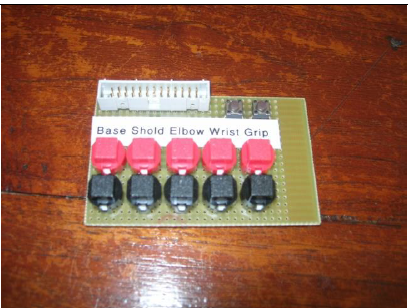
Figure 3 The twelve button interface board.
The picture on the left shows the completed twelve button interface board. The larger red buttons are the Up or Open (grip) functions. The larger black buttons are the Down or Close (gripper) functions. The two smaller buttons on the top left are the LED light on and off respectively.
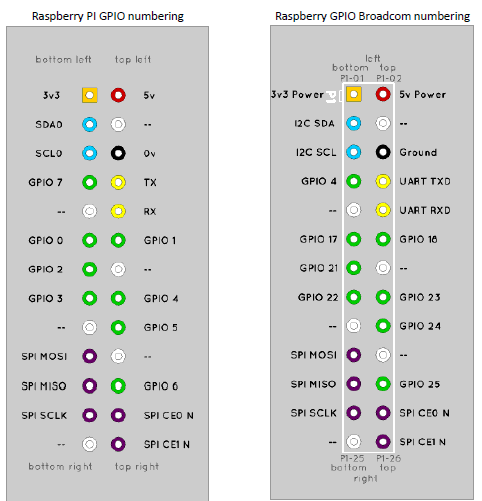
GPIO HARDWARE NOTES
The following shows the pin outs for the GPIO pins.
BUILDING THE MAPLIN ROBOT ARM
The full instructions for building the Maplin Robot arm comes with the kit you purchase from Maplin Electronics. There is also the necessary Microsoft Windows software on a CD to operate and test the robot arm once it has been built. Make sure it is working with the Maplin Windows software before attempting to use it with the Raspberry PI software.
PREPARE THE RASPBERRY PI
Before you can start using the robot arm, there are a few things you will have to do to get your Raspberry Pi ready for the robotic arm and joystick. The first thing you will need to do is add the user account you are using on the Raspberry Pi to the ‘plugdev’ group. Assuming you are using the default ‘pi’ user account, the command to do this will be:
SOFTWARE INSTALLATION
This procedure assumes that the Raspberry PI is installed with Debian Wheezy and with a working Internet Connection. There are a few steps to carry out to install the software.
- Download and un-tar the software from the Bob Rathbone web site
- Create a directory /home/pi/robot
- Un-zip the program files into to the above directory
- Make ally python files executable
RUNNING THE ROBOTIC ARM PROGRAM
Issue the following command:
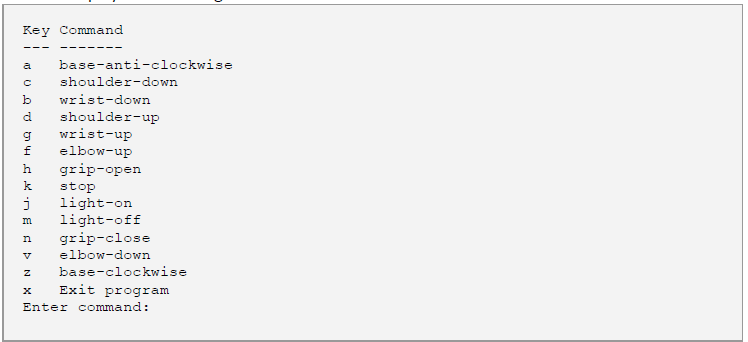
This will display the following:
Now press the appropriate keys on the keyboard to operate the robot arm. Press key ‘x’ to exit the program. If this doesn’t work go to the troubleshooting section on page 16 to determine the exact problem. There is no point attempting to use the joystick or twelve button keypad until the above commands are working.
TROUBLE SHOOTING PROBLEMS
The Raspberry PI hangs whilst booting up with the Robot arm and Joystick connected Disconnect the joystick and robotic arm from the Raspberry PI. Reboot the raspberry PI and once fully rebooted, switch on the robotic arm and connect it along with joystick to the USB ports.
Source: Bob Rathbone
Authors: Bob Rathbone


